
Using Python and Flask to Beat the NYT Spelling Bee Puzzle: Part 1
UPDATE: The app described in this post is now live with a front-end built using the streamlit framework and is hosted on Streamlit Sharing. Be sure to check out Part 2 of this series to read about my experience with that platform.
Lately Sarah and I have been enjoying solving the Spelling Bee Puzzle from the New York Times. Every day, they release a new puzzle with seven letters. The challenge is to come up with as many words as you can that are spelled using only those letters. There is also a “center letter” which must be included in each word. You get more points for longer words, and pangrams, words that use all seven letters at least once, are worth a bonus.
It’s a fun puzzle that’s a nice daily break from everything else going on in our world. The only problem is Sarah is better at it than me. So I had to come up with a way to “improve” (It’s not cheating if you write the code yourself…right?)
I built a web app in Python where I enter in the letters of the puzzle, and it returns a list of words that meet the criteria of the game. It also identifies any of the words that are pangrams. Currently I have the app running on a web server on my Raspberry Pi at home. This way I can access the app from my phone as long as I’m connected to my home wifi network.
Building this app is a nice opportunity to practice and write about some of the software development and skills I have been learning. I developed the app with Python in a Docker container using Git version control. I wrote unit tests along the way and incorporated them into a Continuous Integration build and test pipeline using GitHub Actions. I exposed the functions in a REST API using Flask (also unit tested), and deployed it into a container running on the Raspberry Pi.
Version Control
When working on a programming project, version control is something important to understand. It’s a necessary skill to have if you are collaborating with a team. But even when working alone, it’s useful to know. Version control is a system for tracking changes to a code base. It allows you to keep track of revisions to a project and to test out new features without affecting the working, main version of the code. It also makes it easy to store your code in the cloud to facilitate sharing it with others and safe backups.
I’m using git and GitHub for this project which is the standard set of tools for open source projects. You can see my GitHub repo here.
The “Business” Logic
The first step in making the app is to define the business logic. This will be a Python module that contains the core functionality of the app: finding words that meet the criteria for the game. Separating this code from the rest of the app will make it easier to experiment with and change how I get inputs and deliver results to the users.
The basic idea will be to scan through a list of English words and check each word to see if it meets the criteria. The criteria are:
- Words must contain at least 4 letters
- Words must include the center, “key”, letter
- No “obscure,” hyphenated, or proper nouns
- No cussing
First we will need a list of words. At first I tried the Natural Language Toolkit (NLTK) corpus word list: from nltk.corpus import words. This worked ok, but it returned too many false positive results. The NLTK list is full of proper nouns and words that the NYT puzzle editors deem obscure. I got much better results from Peter Norvig’s word list. The performance of the app is dependent on the word list so it’s important to pick a good one. It seems like the Norvig list is working well, but I am open to suggestions for improvement.
Once we have the word list, we need code to check if words in the list are good words. The first function we will write, check_word(), will check if a given word meets the criteria for the game. It will return True if the word meets the criteria and False if not. The first letter of the string of allowed letters is the key letter that must be contained in all the words.
def check_word(word, allowed_letters):
    """
    Check if a word meets the criteria for the spelling bee game:
        * The word must be four characters or more in length.
        * The first letter in allowed_letters is the key letter.
          The word must contain it.
        * The word may only contain the allowed_letters.
    """
    # first letter is "key." it must be contained
    key_letter = allowed_letters[0]

    # get all un-allowed letters
    bad_letters = re.sub(f'[{allowed_letters}]', '', ascii_lowercase)

    word = word.lower()
    if len(word) < 4:
        return False
    if key_letter not in word:
        return False
    if letters_in_word(bad_letters, word):
        return False

    return True
I will call this function inside another function that will get the words from the word list and return a list of passing words.
def word_finder(allowed_letters):
    """
    Return a list of words that meet the criteria for the spelling
    bee game.
    """
    with open('data/norvig_word_list.txt') as f:
        # file downloaded from http://norvig.com/ngrams/word.list
        word_list = [word.strip() for word in f.readlines()]

    good_words = [w for w in word_list if check_word(w, allowed_letters)]
    good_words.sort(key=len) # sort by length

    return good_words
Now I need a function to test if words are pangrams, meaning they contain each of the seven letters at least once.
def find_pangrams(good_words, n=7):
    """Return a list of pangrams (ie words containing all allowed letters)
        from a list of words. """

    # Any word with 7 unique letters is a pangram
    return [w for w in good_words if len(set(w)) == n]
I put all of these functions into a module called word_finder.py that can be called later from the API and front end for the app.
Testing the business logic
Once I have the functions in word_finder.py, how do I know if they actually do what I want them to? I test them out. One way to do this would be to run the code interactively, providing different sets of inputs and checking if the output is what I expect. This is a natural response, but there is a better way.
The process of providing functions with a set of known inputs and checking against known outputs is called unit testing, and it can be automated. For this project, I’m using the unittest package from Python to define and automatically run a suite of tests.
There are many benefits of automated unit testing, even for a small, simple app like this. It gives you confidence that as the code base changes when new features are added and existing code is refactored, each of the pieces of the project still function as they were intended.
Unit testing is especially important for distributed teams of developers working together on a big project. No single person can keep track of all the changes made to a large code base. If new tests are added and existing tests pass any time new code is pulled into the project, everyone on the team can feel comfortable that the software is working how they expect.
I wont include the full suite of tests in this article. For that you can go to the repo. I’ll include just a sample to show how they work.
After importing unittest and the functions you want to test, you create a class that inherits from unittest.TestCase. You define your individual tests as methods of this class.
In this example, I’m testing the check_word() function. It only returns True or False, so I can use the assertTrue and the assertFalse methods from unittest. For each test case that should return True, I wrap a function call to check_word() inside of the assertTrue method. When the tests are run, unittest will run through all of the cases and make sure all of the functions inside of assertTrue methods are True and all of the functions inside of assertFalse methods are False. There are many other types of assert statements available from unittest. They can be found in the documentation.
import unittest

from word_finder import check_word

class TestCheckWord(unittest.TestCase):

    def test_check_word(self):
        self.assertTrue(check_word('pill', 'liupyubc')) # test a good word
        self.assertTrue(check_word('publicly', 'liuypubc')) # test pangram

        # test failing cases
        self.assertFalse(check_word('ill', 'liupuybc')) # too short
        self.assertFalse(check_word('cubby', 'liupuybc')) # no "key" letter
        self.assertFalse(check_word('prior', 'liupuybc')) # contains bad letters

if __name__ == "__main__":
    unittest.main()
With the tests written in to the test.py module, I can run python test.py in the terminal and unittest will find and run all of the tests. For each passed test, it prints out a dot and some information about the tests. OK means all the tests pass!
>>> python test.py
.....
----------------------------------------------------------------
Ran 5 tests in 1.913s

OK
Continuous Integration
Up until now, I have been calling the unit tests “automatic” because I don’t have to manually run the functions with different inputs and check the outputs. With Continuous Integration, or CI, they can become truly automatic. CI is the process of automatically building and running tests whenever changes are checked into version control. This ensures that the mainline branch of code is always working properly and ready to go. Setting this up is surprisingly easy with GitHub Actions.
GitHub Actions allows you to customize and execute software development workflows right in your repository. The actions can be triggered by any event in your repo like a commit to a particular branch or a pull request. They are all configured by YAML files placed in the repository. This makes them easily sharable between projects.
GitHub comes with several common workflows ready be loaded into repositories. In the Actions tab of the repository, you will find some example workflows suggested by GitHub based on the code in your repo. I chose the workflow titled “Python Application: Create and test a python application.”
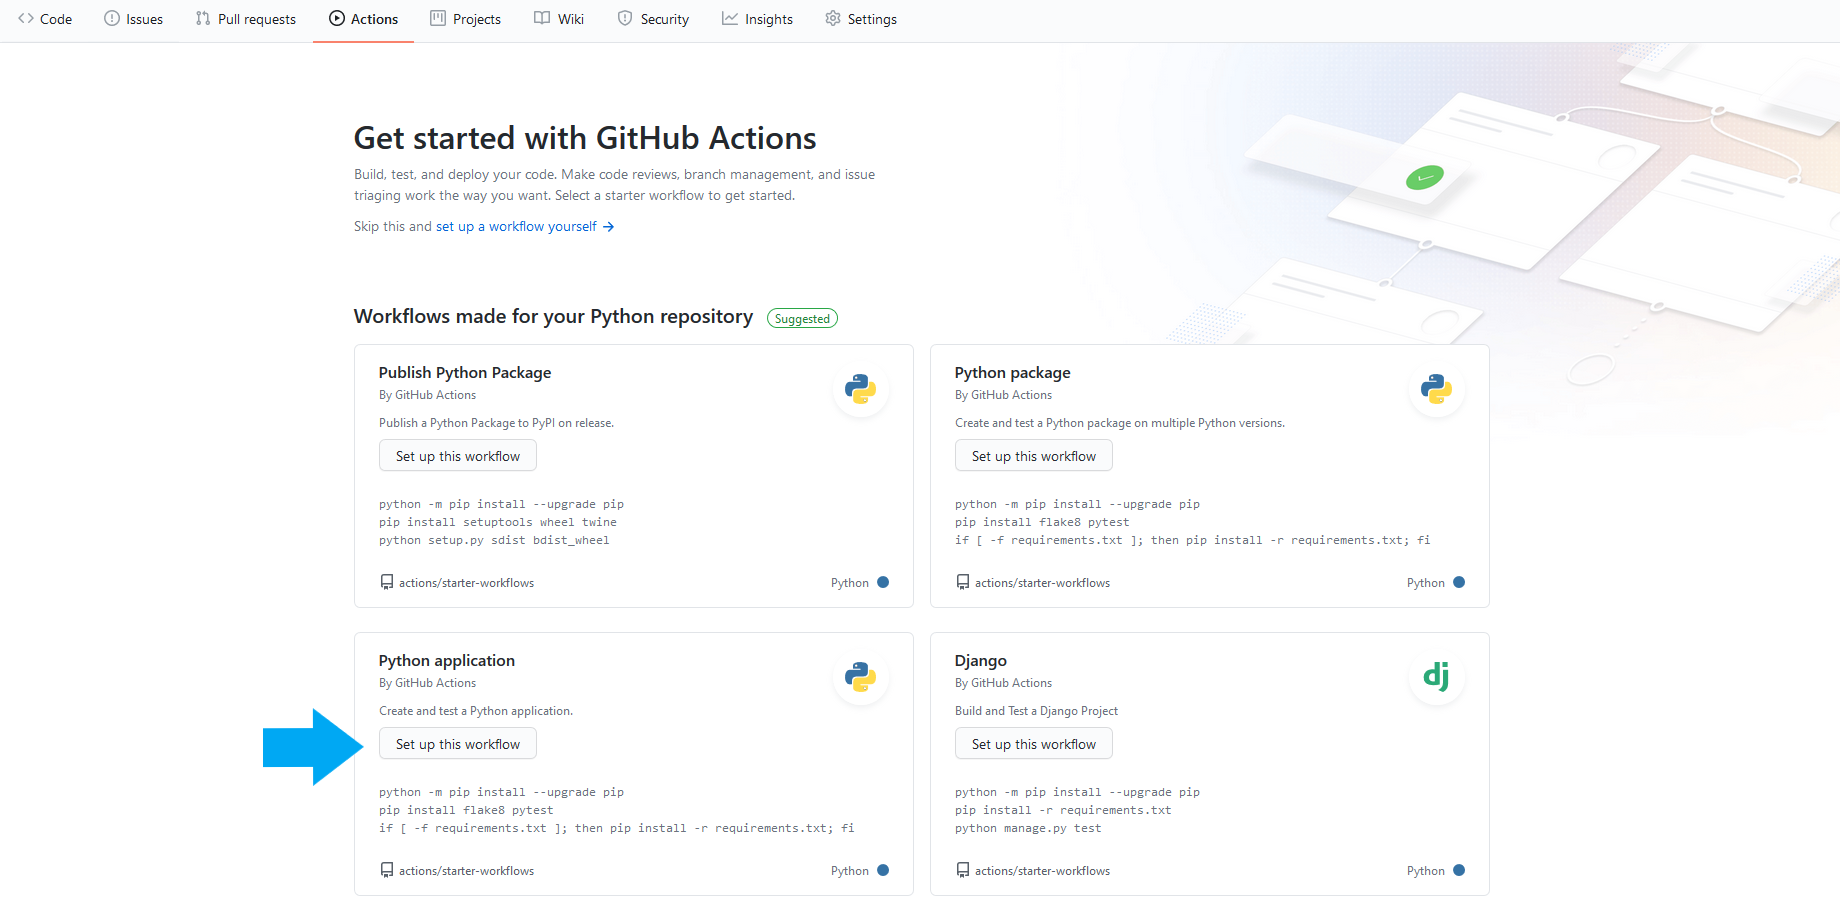
All I needed to do to set up the workflow was click that button and pull the changes into the master branch. The workflow watches for pushes or pull requests to the master branch. When it detects one of these events, it spins up an Ubuntu virtual machine with Python 3.8 and runs the tests using pytest, another testing framework that is able to find and run tests defined with unittest.
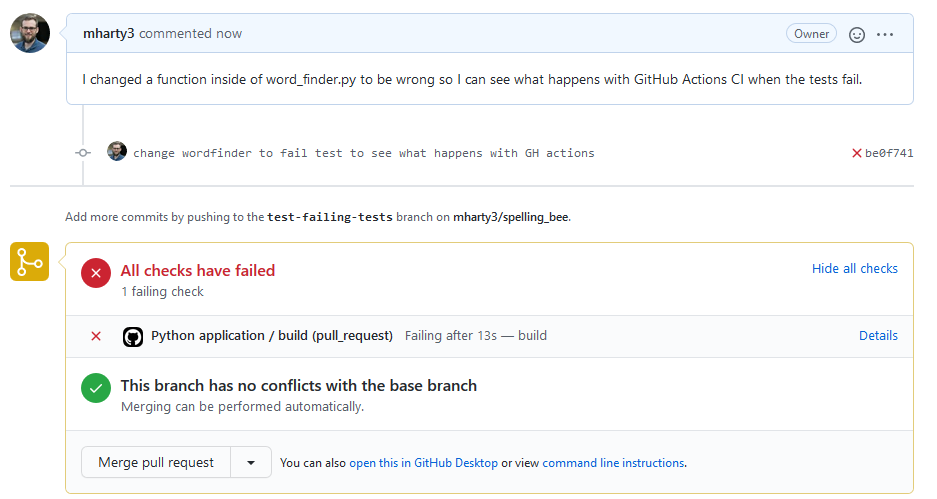
To test out the workflow, I made some changes to word_finder.py in a new branch so I can see what happens when the tests fail. When I created the pull request in GitHub to merge the changes into the master branch, I was greeted with this message: All checks have failed. This lets me know that I should not merge the changes into the master branch.
This is barely scratching the surface of continuous integration/continuous delivery, but automating builds and test runs before merging is important and useful.
REST API with Flask
Now that I have the working, well-tested code, I need a way to deliver it to my users (aka my phone). To do that, I will use a standard architecture for web services, a REST API. REST API stands for representational state transfer application programming interface, and it represents the software architectural patterns that software systems use to share information over the internet.
Exposing the functions in word_finder.py as a REST API can be accomplished with the Python library Flask. To set up a simple API, I started with the minimal Flask application example and made some modifications.
For this simple API, I only need one endpoint or route. I set this up by defining a function called find_words() using the @app.route() decorator. The decorator tells Flask that it needs to expose the endpoint at /api/spelling_bee and run the find_words() function whenever a user requests it. So whenever a user makes a request for [hostname]/api/spelling_bee, Flask will run the function and return the desired information to the user.
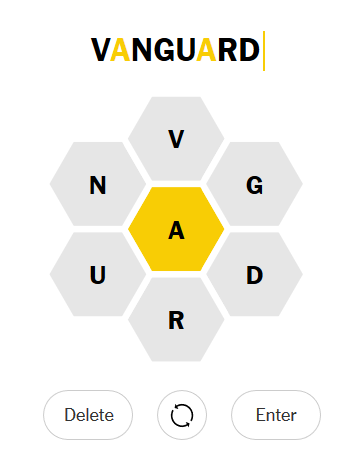
The user must also pass along a query string to tell the application what the letters are for the game. The query string starts with a question mark and follows after the endpoint definition. For example, when I run the application on my laptop during development, I will access this endpoint via http://127.0.0.1:61412/api/spelling_bee?letters=avngurd.
The find_words() function first makes sure that the user provided some letters as part of the query string. Then it calls the functions from word_finder.py to find all the matching words and pangrams based on the label provided. It puts the good words and the pangrams into a dictionary. The flask.jsonify function converts the Python dictionary into a JSON string that can be transmitted over the internet to the client.
from flask import Flask, request, jsonify
import word_finder

app = Flask(__name__)

@app.route("/api/spelling_bee", methods=["GET"])
def find_words():

    # check if letters were provided. if so, assign it to variable
    # if not, display an error

    if 'letters' in request.args:
        letters = request.args['letters']
    else:
        return "Error: No letters provided. Please provide some letters."

    good_words = word_finder.word_finder(letters)
    pangrams = word_finder.find_pangrams(good_words)

    data = dict(pangrams=pangrams, all_words=good_words)
    return jsonify(data)

if __name__ == "__main__":
    app.run(host='0.0.0.0')
This application is really all I need to to meet my goals. I can use the web browser on my phone to access the endpoint, making sure to provide the appropriate letters in the URL, and I can read the JSON returned by the API right in my browser. Later, I will develop a more interactive front end for the app with a form for submitting the letters and a better designed interface for displaying the results.
Testing the Flask App
Just like how I wrote tests for the application logic, now I need to write tests to make sure the API works properly. This can be done with unittest as well, but there is an additional step to take. Before each test case runs, I need to set up a test client to interact with the API. The unittest framework can do this when you define a method called setUp(). The framework runs the setUp() method before each test case. In the setUp() method here, I instantiate the test client. Now I can use the test client in my test cases to make requests to the API and check the responses.
import app
import unittest


class TestApp(unittest.TestCase):

    def setUp(self):
        app.app.testing = True
        self.app = app.app.test_client()


    def test_api_no_args(self):
        response = self.app.get('/api/spelling_bee')
        self.assertEqual(response.status_code, 200)
        self.assertIn(b"Error:", response.data)


    def test_api_with_letters(self):
        response = self.app.get('/api/spelling_bee?letters=avngurd')

        self.assertEqual(response.status_code, 200)

        data = response.get_json()
        self.assertIn('all_words', data.keys())
        self.assertIn('pangrams', data.keys())
        self.assertIn('vanguard', data['pangrams'])
        self.assertEqual(len(data['all_words']), 92)


if __name__ == "__main__":
    unittest.main()
I can put these in a module next to my other test module, and the testing framework and CI service will find them and run them automatically.
Docker
For this project, I used Docker for development and deployment. Docker is a software tool that makes it easier to build and deploy software. It works by creating isolated, portable containers that define the environment and contain code needed to run an application.
One of the main benefits of using Docker are that different dependencies for different projects are isolated and will not conflict with one another. For example, if one project requires version 0.12 of Flask and another project running on the same machine requires version 1.1, this is not an issue with Docker.
Another benefit is the portability. Because the environment is defined programmatically in the Dockerfile, I only have to define and configure it once for both the development and production environment. Once I get the code running inside a container in my laptop, it becomes trivial to build an identical container on the Raspberry Pi server for production.
The instructions to build a Docker image and container are contained in a Dockerfile, a text file that can be checked into version control along with the application code.
Here are the contents of the Dockerfile for this app. It starts with a base image with Python running on the Alpine distribution of Linux. It installs the Python dependencies, copies the source code, and then runs the app.
FROM python:3.7-alpine
RUN apk update && apk add build-base

WORKDIR /app

COPY requirements.txt requirements.txt
RUN pip install -r requirements.txt

COPY /app .
EXPOSE 5000
CMD python app.py
One important note here is that I am using the Flask development server to serve my app. This is the development server that explicitly says it should not be used in a production environment. I still have a lot more to learn about properly deploying apps into a production environment with tools like Nginx and Gunicorn. But since the app is running on my home network, and I can guarantee there will only be one user at a time, this seems to be working fine for now.
Deployment on the Raspberry Pi Home Server
Now that I have the code for both the application and the container checked into GitHub, all it takes is a few commands to pull it down to the Raspberry Pi and build and run the container.
First, I SSH into the Pi, clone the repository from GitHub, and cd into the directory. Now I have an identical copy of the code on the Raspberry Pi.
>>> git clone https://github.com/mharty3/spelling_bee.git
>>> cd spelling_bee/
Next, I build the Docker image from the Dockerfile. The Dockerfile contains all the information needed to create the environment to run the app. The -t option tags the image with the name spellingbee so it can be easily referred to later. The . tells Docker to look for the Dockerfile in the current directory.
docker build -t spellingbee .
Once the image is built, I run it to create a container serving the app!
>>>docker run --restart unless-stopped -dit -p 5000:5000 spellingbee
Now with the app running, I can access it from any device on my network. I connect using the the IP address of my Raspberry Pi, the API endpoints, and the query string. Navigating to http://192.168.0.130:5000/api/spelling_bee?letters=avngrdu in my web browser returns the following JSON string.
{
  "all_words": [
    "agar",
    "anan",
    "anga",
    "anna",
    "arar",
    "arna",
      ...
    "unguard",
    "graduand",
    "granddad",
    "vanguard"
  ],
  "pangrams": [
    "vanguard"
  ]
}
The Wrap Up
This was a fun project to practice and demonstrate some of the software development skills I have learned recently.
Now I know I can always beat the Spelling Bee game!
Stay tuned for future developments including an actual front end, a more robust and reliable web server, and cloud deployment.
Comments